HTML Newsletters
Though Levitate's mantra is personal keep-in-touch, and we know statistically speaking, a plain email has much higher open and reply rates than a fancy HTML newsletter -— we still recognize that at the end of the day, some of our users actually do have a real use-case for HTML newsletters.
By allowing graphic-rich email content, our HTML Newsletter feature is another way for you to keep in touch with your clients and prospects more efficiently.
At a high level, here's how our HTML Newsletter feature works:
- You can use our pre-built template, or create your own using an easy-to-use drag and drop email template builder.
- Rather than using your email provider to send HTML newsletters, we will use our email sending capabilities, through a custom HTML domain that's associated with your company. Replies will still come back to the email address you have connected to Levitate! This applies to all of our customers with the exception of the ones in the financial industry. For our financial customers, we can still deliver using your email server for FINRA compliance purposes.
- Like our regular campaigns, you can track open, view, and click rates.
Note: All HTML newsletter sends will show on each recipient's contact profile. Just like plain text emails, text messages, and other activities, this send will write back to any integrated software.
Table of Contents
- Building a Template
- Sending the Newsletter
- Using Merge Fields in the Subject Line
- Reporting
- HTML Newsletter Save Options
- Resending an HTML Newsletter to Non-Openers
- Using HTML Newsletters in Automations
- Linking to Videos in Newsletters
- Template Visibility
- FAQs
Now, let's take a deeper dive and see how you can send out your first HTML newsletter step by step.
Building a Template
First, you can find the HTML Newsletter feature in the Campaign section.
Please note that this feature can only be turned on by your success manager or Levitate Support — reach out to your success manager or support@levitateapp.com to have it enabled.
You can start by building your own HTML template, or start with the one we've provided for you and go from there.

On the right-hand side of the panel, you will see many tools to help you create the layout of your newsletter.

If you'd like to make sure that the newsletter you're working on autosaves while you're creating it, so no important work gets lost, you can enable autosave:

One cool feature to highlight here — just like our regular campaigns, you can insert the "first name" of the recipient into the body of your newsletter, along with some other fields (however, be careful with these to make sure you actually have all of the fields correctly in Levitate).


No doubt, building out your template to your heart's desire is the hardest part. Feel free to save it and work on it later. You can also take the same template you've built and save it as another template. When you feel like you are getting closer, you can preview how the email will look on someone else's desktop or on the mobile phone.
Using Merge Fields in the Subject Line
You can personalize the subject line of an HTML newsletter with merge fields, just like you can in regular email campaigns. For example, adding {{first name}} to your subject line will insert each recipient's first name when the email is delivered.
Unlike the newsletter body editor — which has a built-in merge tag picker — the subject line is a plain text field. You must type the merge field syntax directly using double curly braces.
How to add a merge field to the subject line
- Open your HTML newsletter in the editor.
- Click into the Subject field at the top of the editor.
- Type your subject line and insert the merge field using double braces. For example:
{{first name}}, check out our latest update - Save the newsletter. The merge field will be resolved for each recipient at send time.
Note: The same merge fields available in regular campaigns are supported in the HTML newsletter subject line. For the full list of supported merge fields and their syntax, see Merge Fields. Make sure all recipients have the relevant field populated in Levitate — for {{first name}}, Levitate's Smart Salutation provides a fallback if the field is empty, but other merge fields will simply render blank if the contact record does not contain a value.
Sending the Newsletter
When you are ready, you can test out the newsletter first by sending a test. You'll receive a copy of the newsletter, so you can see how it looks before sending it for real.

Once you are ready to send, you can just click on the green Send out HTML Newsletter on the top right. The rest of the experience should feel very familiar to the regular campaign send flow. You select the tag groups you want to receive the newsletter, and go from there!

One thing to note is that by default, Levitate will include an unsubscribe link at the bottom of your newsletter to comply with the CAN-SPAM Act. Recipients would see this link and unsubscribe on their own (which is a little different from how our regular email campaigns work). There's nothing to do on your end to make sure it works. Once a user is unsubscribed, they will have the "unsubscribe" tag and will also stop receiving ALL email campaigns from you.
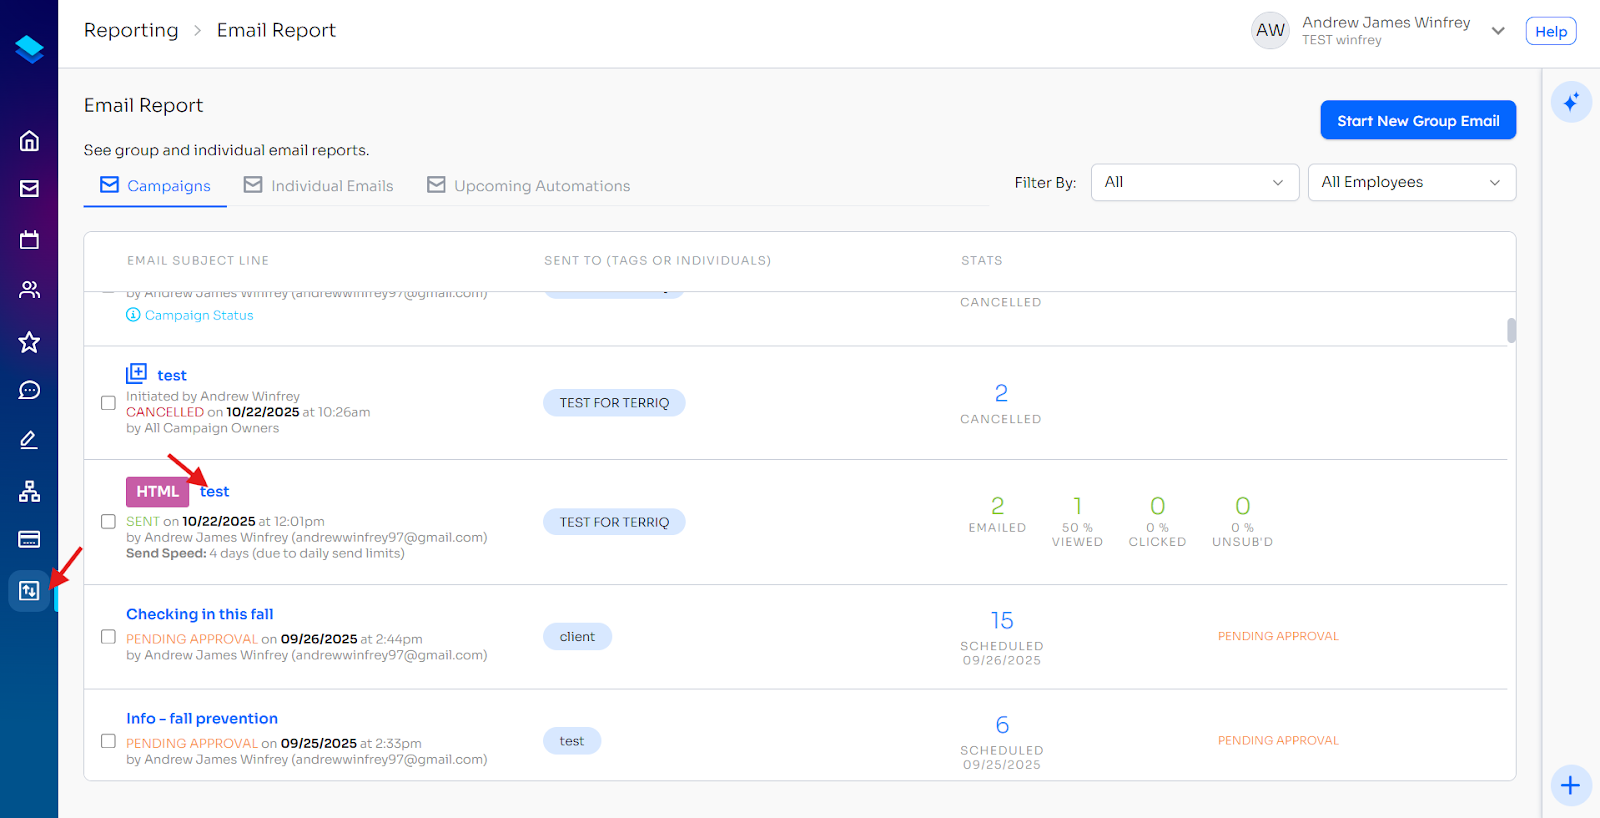
Reporting
Once your HTML Newsletter has gone out, you can start seeing the open and reply rates as usual, but we've also added the click rate in case you've embedded any links or buttons into the HTML Newsletter!

HTML sends to contacts will also show on their contact profile's timeline. These sends will write back to your source system if integrated. Write back for HTML sends began in July 2024, so moving forward from then, all HTML sends will be logged on contact profiles and written back to integrated source systems.

Public Link
The reporting view for each HTML newsletter campaign includes a Public link toggle. When you enable it, Levitate generates a unique URL where anyone — not just your original recipients — can view the newsletter in their browser. This is useful when you want to share the newsletter on social media, post it on your website, or send it to someone who was not on your original send list.


To enable and use the public link:
- Open the reporting view for a sent HTML newsletter campaign.
- Locate the Public link toggle and switch it on.
- A URL will appear next to the toggle. Click the Copy button to copy the link to your clipboard.
- Share the link anywhere you like — anyone who has it can view the newsletter without logging in to Levitate.
- To revoke access, return to the same reporting view and toggle Public link off. The URL stops working immediately.
Note: The Public link toggle is off by default for every campaign and must be enabled individually per newsletter. This feature is available on HTML newsletter campaigns only.
When the public link is enabled, the link you copy and share is a short go.levitate.ai link that points to the hosted view of the newsletter.
HTML newsletter save options
Along with saving a draft or copy of an HTML newsletter to your Levitate library, there are a few options for enhancing your HTML newsletter creation experience.

- Autosave— when this box is checked, your progress while creating and editing an HTML newsletter will be periodically saved so that you don't lose any important work.
- Save— this will save all the work you've done on the current newsletter
- Save as New Template— this will save a new copy of the newsletter you're currently working on
- Export— this will allow you to download the HTML newsletter as a PDF or as HTML to your computer
Resending an HTML Newsletter to Non-Openers
Step-by-Step Instructions
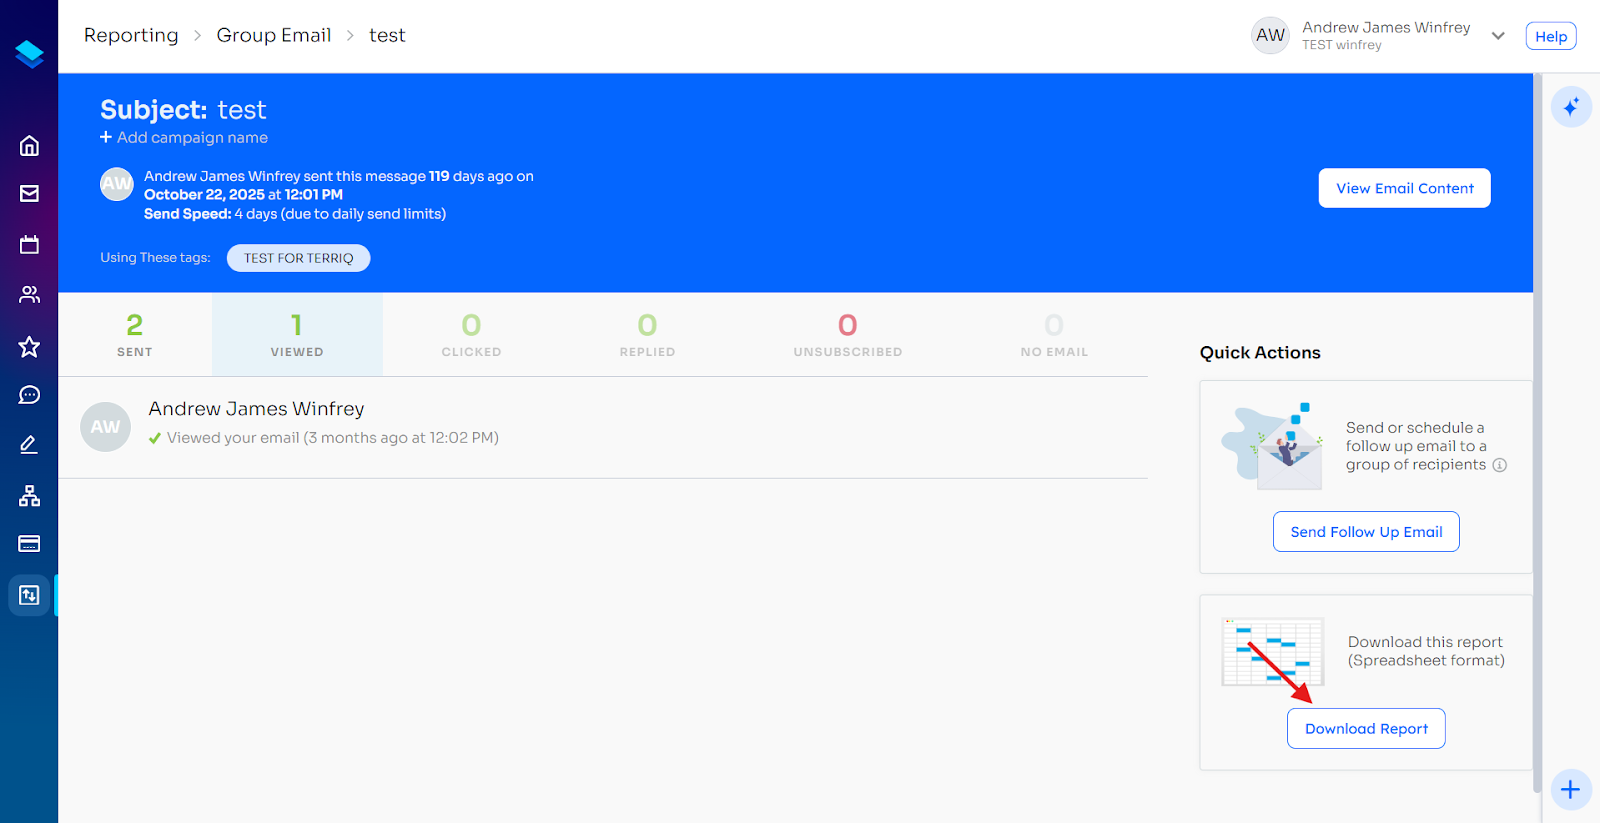
- Navigate to the Reporting page for your sent newsletter.
- Click on "Download Report" to get a list of all contacts that received that newsletter.
- On the exported spreadsheet, remove all columns except for first name, last name, E-mail address, and status.
- Filter the spreadsheet by the "status" column and remove everyone else who does not have the correct status.
- Add a tag to that spreadsheet to identify those contacts and then import those tags into Levitate.
- Go to the newsletter section and send it out as normal to the newly created tag group.


Best Practices
- Timing: Wait at least 3-7 days after initial send before resending
- Subject Line: Consider modifying the subject line for better engagement
- Frequency: Avoid resending more than once to the same non-openers
- Testing: Check your open rate threshold before deciding to resend
Using HTML Newsletters in Automations
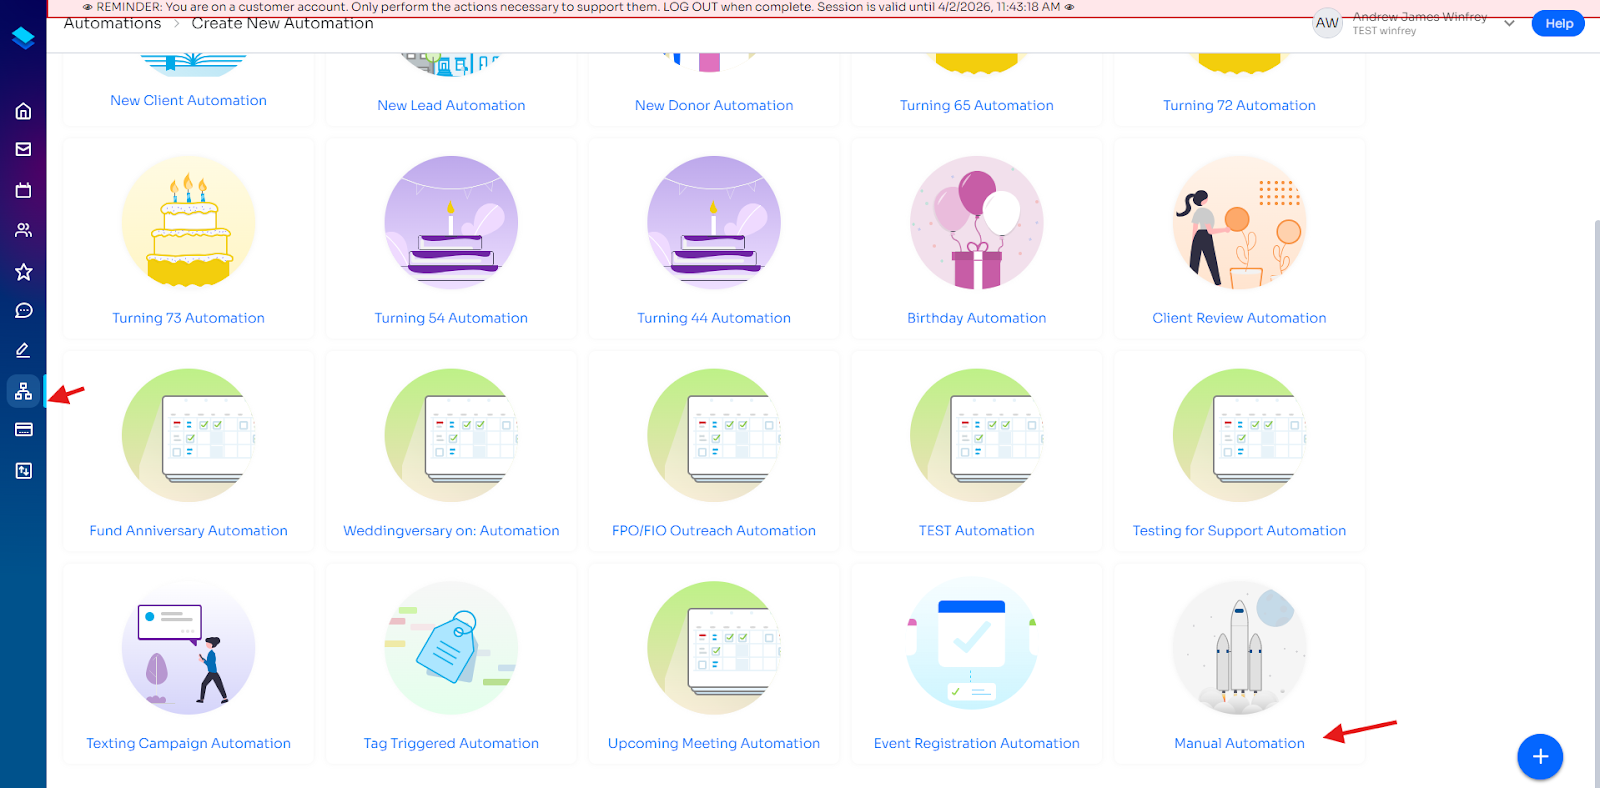
HTML newsletters can be used as email steps in manual automations.
To add an HTML newsletter to an automation:
- Navigate to the Automation Builder.
- Click Create New, then select Manual Automation.
- Add a step after creating the automation.
- Choose the option to select an existing newsletter.
- Locate and select your HTML newsletter.
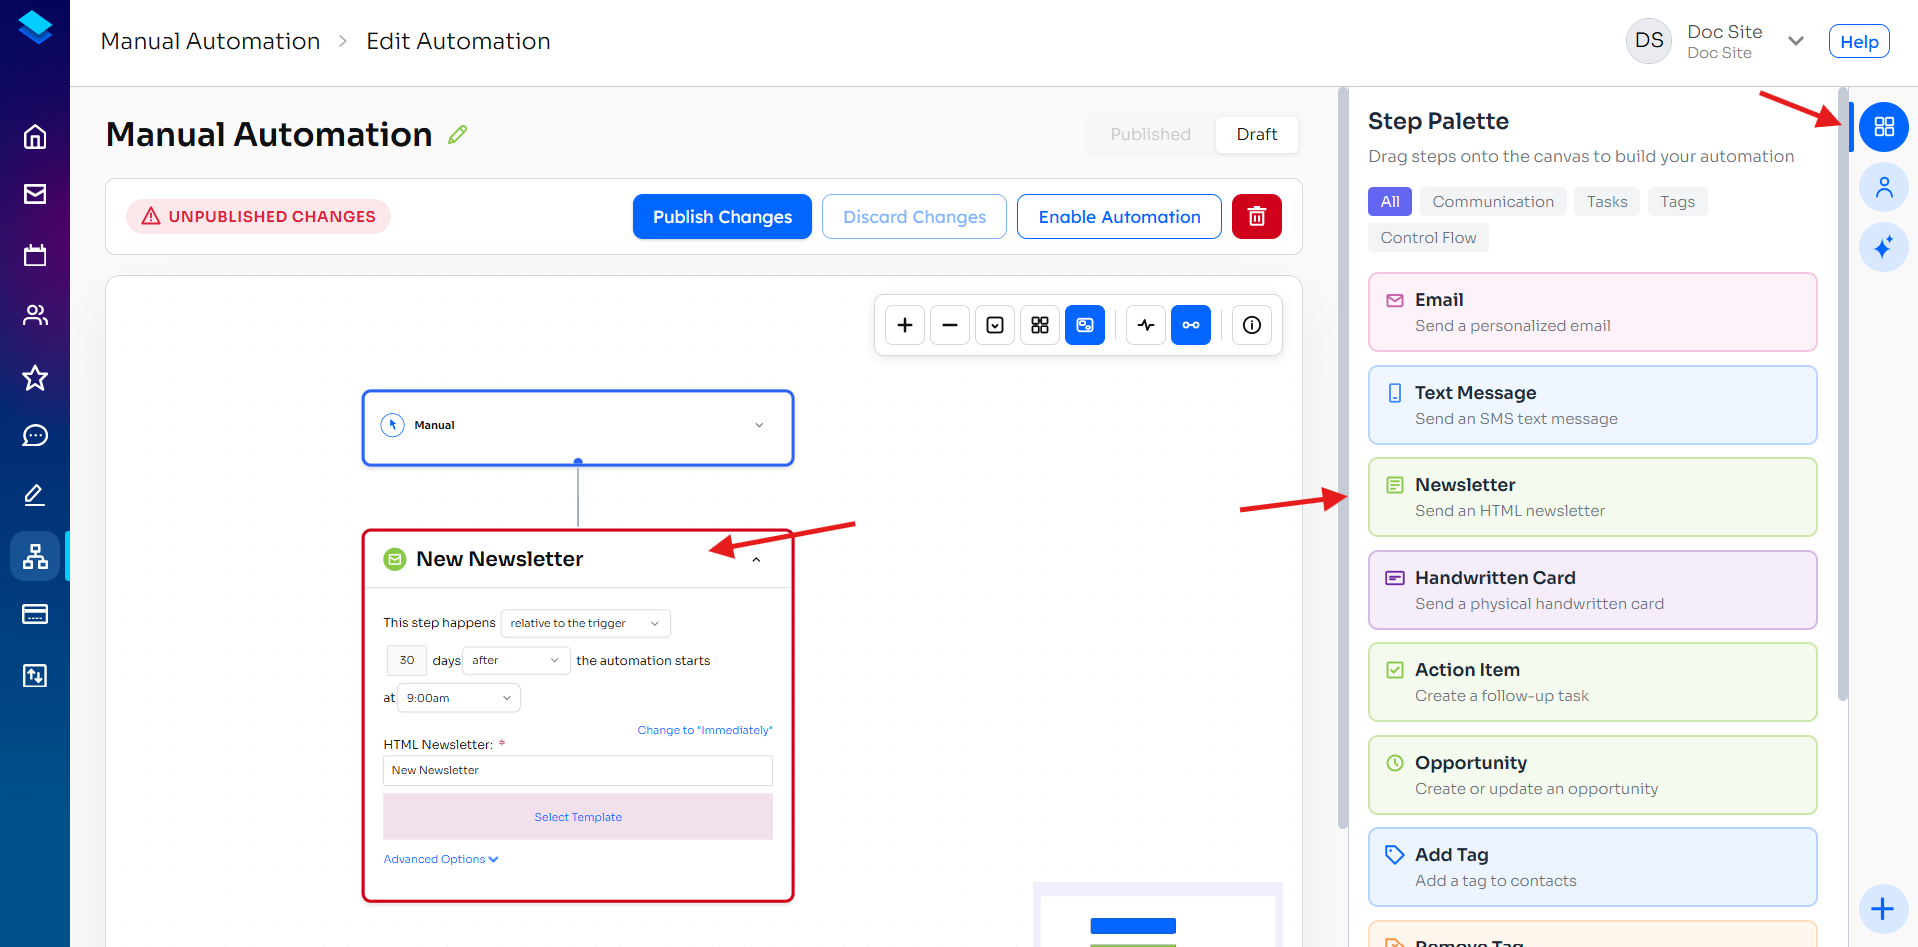
- Save and publish the automation.


This will allow the HTML newsletter to be sent as part of your automation workflow.
Linking to Videos in Newsletters
Videos cannot be directly embedded to play inside email newsletters. Most email clients such as Gmail, Outlook, and Apple Mail do not support embedded video playback due to security restrictions and technical limitations. The recommended approach is to link to a video hosted on a video platform or your website using a clickable thumbnail image.
Why email clients don't support embedded video
- Security concerns – Videos could potentially contain malicious code
- File size limitations – Video files are often too large for email delivery
- Compatibility issues – Embedded video does not work consistently across different email clients
- Bandwidth and loading concerns – Large media files can cause slow load times for recipients
Because of these limitations, embedded video playback is generally not supported in email marketing.
Best Practice: Link to Videos Using a Thumbnail Image
The recommended approach is to use a clickable thumbnail image in your newsletter that links to the video hosted on a video platform or your website. When the recipient clicks the image, the video will open in their browser.
Step-by-Step Instructions for Linking a Video
1. Host Your Video
Upload or host your video on a video platform such as:
- YouTube
- Vimeo
- Your website
- Any other video hosting service
2. Create a Thumbnail Image
Create an image that will represent your video in the newsletter.
Suggestions:
- Take a screenshot from an engaging moment in the video
- Add a play button overlay so readers know it is a video
- Use an image editing tool or the video platform's thumbnail creator
- Recommended size: ~600px wide for a standard single-column email layout
3. Add the Thumbnail to Your Newsletter
- In the HTML builder, add an Image content block
- Upload your thumbnail image
- Adjust the image width
- Typically 100% width for full-column layouts
- Or adjust to fit your design
4. Link the Image to Your Video
- Click on the thumbnail image in your newsletter editor
- Scroll to the Link section in the image settings
- Paste the video URL (YouTube link, Vimeo link, or webpage link)
- Click Save
5. Add Supporting Text
Add a text block above or below the thumbnail to provide context and encourage clicks.
- A clear headline describing the video
- A call-to-action, such as "Click to Watch" or "Watch Now"
- A short description of what the video covers
Troubleshooting
Issue: Recipients Don't Realize the Image Is Clickable
Solution:
- Add a visible play button icon on the thumbnail image
- Include a clear call-to-action, such as "Click to Watch" or "Watch Now"
- Consider adding a text link below the image as a backup option
- Use contrasting colors so the thumbnail stands out from the rest of the newsletter
Issue: Video Link Doesn't Work When Clicked
Solution:
- Verify that the video URL is correct and publicly accessible
- Test the link yourself before sending the campaign
- Ensure the video is not set to "Private" on platforms like YouTube or Vimeo
- Use the full video URL instead of shortened links that may break
Issue: Thumbnail Image Looks Blurry or Stretched
Solution:
- Use high-resolution images (at least 600px wide)
- Set the image width to 100% to prevent distortion in the email layout
-
Compress images carefully without reducing their dimensions
Follow image optimization best practices for email design
Best Practices Summary
To ensure the best experience when including video content in newsletters:
- Host videos externally (YouTube, Vimeo, or your website)
- Use high-quality thumbnail images with a play button overlay
- Include clear call-to-action text encouraging readers to watch
- Test all video links before sending campaigns
- Provide context explaining what the video contains
-
Be mindful of email client limitations your audience may have
Following these guidelines will help ensure your video content is easy to access, visually engaging, and compatible across email platforms.
Still have questions about designing a newsletter? Check out our HTML FAQs here.
Template Visibility
By default, all HTML newsletter templates — including Levitate-provided templates — are visible to every user on your account. Admins can configure the account so that Levitate-provided newsletter templates are hidden from non-admin users. When this preference is on, non-admin users see only templates that have been saved by their team; Levitate's out-of-the-box templates do not appear in their template picker.
Admins can change this in group settings under Settings → Admin.
FAQs
Q: Can I do the "send follow up email" workflow for HTML newsletters?
A: No, we do not currently support "send a follow up email" for HTML newsletters.
Q: How long does open tracking take to update?
A: It is instantaneous. When anyone clicks the email, regardless of who, it will trigger the tracking pixel and will update in real time.
Q: Can I use an HTML newsletter in a manual automation?
A: Yes — see Using HTML Newsletters in Automations above for the full step-by-step.
Q: What is the default HTML newsletter send limit?
A: Your default daily send limit for HTML newsletters is 5000 per day.
Q: How do I increase my HTML newsletter send limit?
A: Contact Levitate Support to request an increase. Limits can be adjusted based on your account's needs and sending domain configuration.
Q: The subject line for my HTML newsletter is showing something weird in my inbox— what do I do?
A: You need to change the 'Preheader.' To do this, you'll go to the newsletter, select 'Body,' scroll down, and you'll see 'Preheader Text.' There, you can update the preheader.
Q: Can I use merge fields like first name in the subject line of an HTML newsletter?
A: Yes. The subject line accepts the same merge field syntax as the body — type the field name in double curly braces (for example, {{first name}}). The newsletter body editor has a built-in merge tag picker, but the subject line is a plain text field, so you type the merge field directly. See Using Merge Fields in the Subject Line above for the full walkthrough and the link to the supported merge field list.
Q: My HTML newsletter is not showing images or formatting in my inbox.
A: This is more than likely due to Outlook blocking the images based on your settings. Outlook users must sometimes allow images to show in received messages. Furthermore, Outlook can sometimes handle HTML poorly and show a distorted version of your newsletter built in Levitate.
We recommend that you look at the full newsletter on outlook.com instead of in your email client.
Q: I need to update the signature on my HTML newsletters— what do I do?
A: If you need to update or change the signature used on your HTML sends, reach out directly to Support at support@levitateapp.com— they can get it updated on their end.
With newsletters, there is a required signature field for CAN-SPAM compliance that is unable to be edited or removed.
Q: How do I update the physical address shown in the footer of my HTML newsletter emails?
A: The physical address that appears in the CAN-SPAM-required footer of your HTML newsletters is set at the account level and is not editable directly within the newsletter builder. To update it — for example, if your business has moved to a new address — contact Levitate Support at support@levitateapp.com and a member of the team will update it for you.
Q: Is there a public link I can share so recipients can view the newsletter in their browser?
A: Yes — see Public Link above for how to enable, share, and revoke the link. The toggle is off by default and is available on HTML newsletter campaigns only.
Q: Can I embed videos directly in my newsletter?
A: No — see Linking to Videos in Newsletters above for the recommended thumbnail approach and the reasons embedded video isn't supported by email clients.
Q: Can I use an HTML newsletter in an automation?
A: Yes — see Using HTML Newsletters in Automations above for the full step-by-step.
Q: I am sending an HTML newsletter on behalf of another user — how do I add their email signature?
A: HTML newsletter signatures are not self-serve in the same way that regular email signatures are. The signature (including the required CAN-SPAM compliance block) is configured at the account level by Levitate Support. If you need to add or update a specific user's signature for HTML sends, contact Support at support@levitateapp.com and let them know whose signature needs to be added. For regular (non-HTML) email campaigns, each user can manage their own signatures in their personal settings — see Email Signatures in Levitate for instructions.
Q: Our HTML newsletter test email landed in spam when we tested it using an external email domain — will this happen to our real sends?
A: Test emails sent to an external email address on a domain you do not own may land in spam. This is a known behavior of test sends to third-party domains and does not reliably predict how your production newsletter will be delivered to your actual recipients. HTML newsletters are sent via Levitate's custom sending domain, which is configured with the appropriate SPF and DKIM records for your account. Production sends to your real contact list go through that configured domain and are less likely to be filtered. If you have ongoing deliverability concerns after reviewing your sending domain setup, contact Support at support@levitateapp.com for guidance.
Q: I cancelled an HTML newsletter campaign but I am still unable to send regular emails — what should I do?
A: Cancelling an HTML newsletter campaign does not affect your ability to send regular email campaigns — the two features use separate sending paths. If you find that regular email sends are blocked after cancelling a campaign, this is likely unrelated to the cancellation itself. Check whether your account has any pending issues (for example, a sending limit reached, an unresolved compliance flag, or a connected email provider error). If the problem persists, contact Support at support@levitateapp.com so the team can investigate your account's sending status.
Q: The names (or other merge fields) in my HTML newsletter are showing up with wrong formatting or not rendering correctly — how do I fix this?
A: Merge fields in the HTML newsletter body editor use the built-in merge tag picker to insert the correct format. If a merge field is rendering incorrectly — for example, showing the literal placeholder text instead of the recipient's name, or showing garbled characters — the most common causes are:
- Manually typed merge fields with incorrect syntax. If you typed a merge field by hand instead of using the merge tag picker, the syntax may be slightly off. The correct format uses double curly braces and lowercase text, for example
{{first name}}. Variants like{{firstName}}or{first name}may not resolve correctly for all recipients. Use the picker in the editor toolbar to insert merge tags to avoid this. - The contact record is missing the field value. If a recipient's contact record in Levitate does not have a value for the merge field you used — for example, no first name is on file — the field will render blank or fall back to a default. Review your contact records to make sure the relevant fields are populated before sending. For the
{{first name}}field, Levitate's Smart Salutation provides a fallback; other fields render blank if empty. - The merge field was inserted into a text block that was later reformatted. Reformatting or copy-pasting content in the editor can sometimes break the underlying merge tag. If a merge field looks correct in the editor but renders wrong in a test send, delete and re-insert it using the merge tag picker.
To verify how merge fields will render before sending to your full list, use the Send Test option in the editor. This delivers a copy of the newsletter to your chosen contact so you can review the output. If merge fields still do not resolve correctly after following these steps, contact Support at support@levitateapp.com.
Q: My large HTML newsletter seems to transmit or send differently depending on whether autosave is on — what should I do?
A: Autosave in the HTML newsletter editor periodically saves your work in the background as you make changes. For most newsletters this is helpful, but in some cases — particularly with very long or complex newsletters — an autosave that runs just before you click Send may save an intermediate version of the template rather than the final one you intended to send.
If you suspect autosave is affecting your send, try the following steps:
- Before sending, manually click Save in the editor toolbar to ensure the latest version of your newsletter is saved.
- After saving, reload the newsletter from your library to confirm the saved version matches what you intend to send.
- If the issue persists, turn off Autosave using the checkbox in the editor before making your final edits, then save manually and proceed to send.
Note: Turning off autosave only affects the current editor session by default. Your autosave preference is stored in your browser, so if you use a different browser or clear your browser data, the setting may revert. You can re-enable autosave at any time using the same checkbox in the editor toolbar.
If you continue to experience issues with large newsletter sends, contact Support at support@levitateapp.com for assistance.
Q: Can I insert or embed a Word document or PDF file into the body of an HTML newsletter?
A: No — the HTML newsletter editor does not support inserting or embedding Word documents (.doc, .docx) or PDF files directly into the newsletter body. The editor's file upload accepts images only. If you want to share a document with recipients, the recommended approach is to host the file somewhere accessible (for example, on your website, Google Drive, or Dropbox) and then add a button or text link in your newsletter that points to the hosted URL. Recipients click the link to download or view the file in their browser. Note that the Export option in the newsletter editor exports your finished newsletter as a PDF — it is not for importing PDFs into a newsletter.
Q: I added myself as a new user in Levitate — why are HTML newsletters still not sending correctly?
A: Adding a user to Levitate does not automatically activate HTML newsletter sending for that user. HTML newsletters require a separate setup step: the feature must be enabled on your account and a custom sending domain must be provisioned for it. This feature can only be turned on by your success manager or Levitate Support — reach out to your success manager or support@levitateapp.com to get the feature enabled. Once the feature is active and the sending domain is ready (domain provisioning takes roughly 10–15 minutes), HTML newsletters will be available to send. If the feature appears enabled but newsletters are still not sending as expected, contact Support so the team can review your account's domain and sending configuration.
Q: How do I switch my HTML newsletter sending to use a custom sending domain or a different sending setup?
A: HTML newsletter sending domains are configured at the account level by Levitate Support — they cannot be changed directly within the newsletter builder. Each account that sends through Levitate's server is assigned a custom newsletter domain (for example, firstname.lastname@yourcompany-newsletter.com). If you need to change your sending domain, switch from Levitate's server to your own email address and domain (or vice versa), or resolve an issue with your current domain, contact Support at support@levitateapp.com and the team will assist on a case-by-case basis. For more detail on how custom sending domains work and the trade-offs between sending options, see Custom domains for HTML Newsletter sending.
Q: The HTML Newsletters section is not showing on my account — how do I get it enabled?
A: HTML Newsletters is a feature that must be enabled on your account before it appears, and can only be turned on by your success manager or Levitate Support. Contact your success manager or reach out to support@levitateapp.com to have the feature enabled — as part of activation, you'll need to provide your business's physical address, which is required for the CAN-SPAM-compliant unsubscribe footer that appears on every HTML newsletter.
Q: A user on my account is showing as pending — can they send HTML newsletters?
A: A user who has not yet accepted their invitation and completed account setup is in a pending state and cannot send HTML newsletters. The user needs to accept their invitation, sign in, and connect their email account before they can access sending features. Once the user has completed those steps, HTML newsletters will be available to them, provided the feature is enabled on the account. If the user remains stuck in a pending state, contact Support at support@levitateapp.com so the team can check the invitation and help activate the account.
Q: I'm having trouble sending an HTML newsletter and need urgent help — what should I do?
A: If you run into an issue when trying to send an HTML newsletter and need urgent assistance, contact Levitate Support at support@levitateapp.com or by phone. For time-sensitive sends, calling Support is the fastest way to reach a specialist who can diagnose the issue in real time. When you reach out, describing what you were doing when the problem occurred and noting any error messages you saw will help the team investigate quickly.