
Campaign Suggestions
Campaign Suggestion takes Levitate's Content Calendar to the next level! In addition to the wonderful content, the Levitate Marketing Team is now suggesting the best date and time for specific Campaigns. At your leisure, simply browse to your Content Calendar, review the suggestions, and schedule the campaigns that best suite your audience!
Using Campaign Suggestions
From the Levitate dashboard, choose Content Calendar

Browse the Campaigns you currently have scheduled

Click the Turn on suggestions! toggle

Suggestions from an AI Content Calendar, which your Success team sets up for your account, are labeled AI Suggested. Hover the sparkle icon on an AI Suggested card to see the Reasoning behind the recommendation, so you can quickly assess whether a suggestion fits your audience before scheduling.
Once you've chosen the content you'd like to tee up, you will choose Schedule suggested content and be able to see everything you've selected in the Multischeduler view

You'll be able to choose a send date for each piece you've chosen
In the Customize Email step, use the Send a Test button to preview how an individual email will look before saving your changes.

Bulk actions in the Multischeduler
Once you've selected suggestions and opened the Multischeduler view, the toolbar offers bulk actions for refining content across many posts at once.
Apply branding to all images
Apply branding to all images is available when scheduling social posts, next to Make Content Unique with AI. It requires branding settings on your account and is disabled when none of the selected posts have images.
Branding is applied per post — every image attached to the same scheduled post is processed together so the branding stays consistent within that post. Larger batches are paced automatically: at most a few branding jobs run at once, and additional posts queue up until earlier ones finish, which keeps things stable on multi-post selections with many images.
While branding is running, you'll see a live progress indicator showing Branding image N of M so you can track exactly how far along the batch is. Each image moves through three visible stages — Generating, Reviewing, and Refining — so instead of the page appearing frozen, you get a clear picture of what's happening at every step.
Make Content Unique with AI
The bulk Make Content Unique with AI action regenerates content for the items you've selected. Items that come from Custom content or a Custom Content Template, items that have already been customized for your account, and items flagged as firm-approved copy for compliance review are not eligible for bulk regeneration — those items stay as-is. If nothing in your selection is eligible, the bulk action is disabled. You can still regenerate a single item from its own row when needed.
Note: Bulk Make Content Unique with AI is available once your account's content preferences (business description, tone, location, etc.) are filled in. Contact your Success Manager if you don't see it.
Per-campaign audience
By default, all campaigns you schedule share a single audience. The Schedule campaigns modal lets you assign a separate contact filter to each campaign so different campaigns can reach different groups in the same scheduling session.
Switching to per-campaign mode
When the Schedule campaigns modal prompts you to choose an audience, select Set audience per campaign. The modal switches to a per-row layout where each campaign shows its own audience controls independently of the others.
Audience tag chips
Each campaign row displays its current audience as a row of tag chips. Click the + icon next to a row to add a tag to that campaign's audience, or click the x on an existing chip to remove it. Adding or removing a tag on one campaign has no effect on the others.
Edit audience flyout
For more precise targeting, click Edit audience on a campaign row to open a scoped flyout for that campaign. The flyout gives you the full advanced-filter set — filter by contact properties, activity, tags, and segments — plus a contact exclusion list. All filters and exclusions you configure in the flyout apply only to that campaign.
Audience applied at send time
When you confirm the schedule, each campaign is sent using its own contact filter. Campaigns that were left at the default audience use the account-level audience setting.
Google review posts
When a generated calendar includes social posts, each month also gets one extra social post that showcases a five-star Google review your account has received. The review appears as a branded testimonial card. These posts are in addition to the social posts the calendar would otherwise include, and there is no separate setting to turn them on. Calendars that are email-only or blog-only don't include them.
What the post contains
- The reviewer's own words. The post text is the review itself. No AI-written caption is added.
- Stars. The star rating is always shown on the card.
- Reviewer name. The name is left off when the reviewer is anonymous.
- Long reviews. A review that is too long for the quote area is shortened to fit, ending at a sentence break where possible and at a word break otherwise.
Branding
The card uses the Google review post branding saved on your account: your colours, background artwork, and the Google logo. This is the same design the testimonial editor uses when you turn a Google Review into a Social Media post. If your account has no saved branding, the card is created in a default style.
Which reviews are used
Only five-star Google reviews that include written text are used, newest first, and a review is never showcased twice. Star-only reviews are never used. Reviews that already have a post, or that are already part of another active entry on your calendar, are skipped. When you regenerate a calendar, reviews that are used only by entries the regeneration replaces can be used again.
A month with no eligible review doesn't get a review post. This happens when Google Business isn't connected to your account or when you have no five-star reviews with written text that haven't already been showcased.
Note: Google review posts appear on suggestions from an AI Content Calendar, which your Success team sets up for your account. Contact your Success Manager if you don't see them.
Refining AI-Generated Content
Note: These options appear on suggestions from an AI Content Calendar, which your Success team sets up for your account. Contact your Success Manager if you don't see the options described below.
After Levitate generates an email, social post, or blog suggestion in your Content Calendar, you can fine-tune the wording using plain-language instructions — no need to rewrite from scratch. Describe the change you want and Levitate updates the content preview in place.
Opening the refinement panel
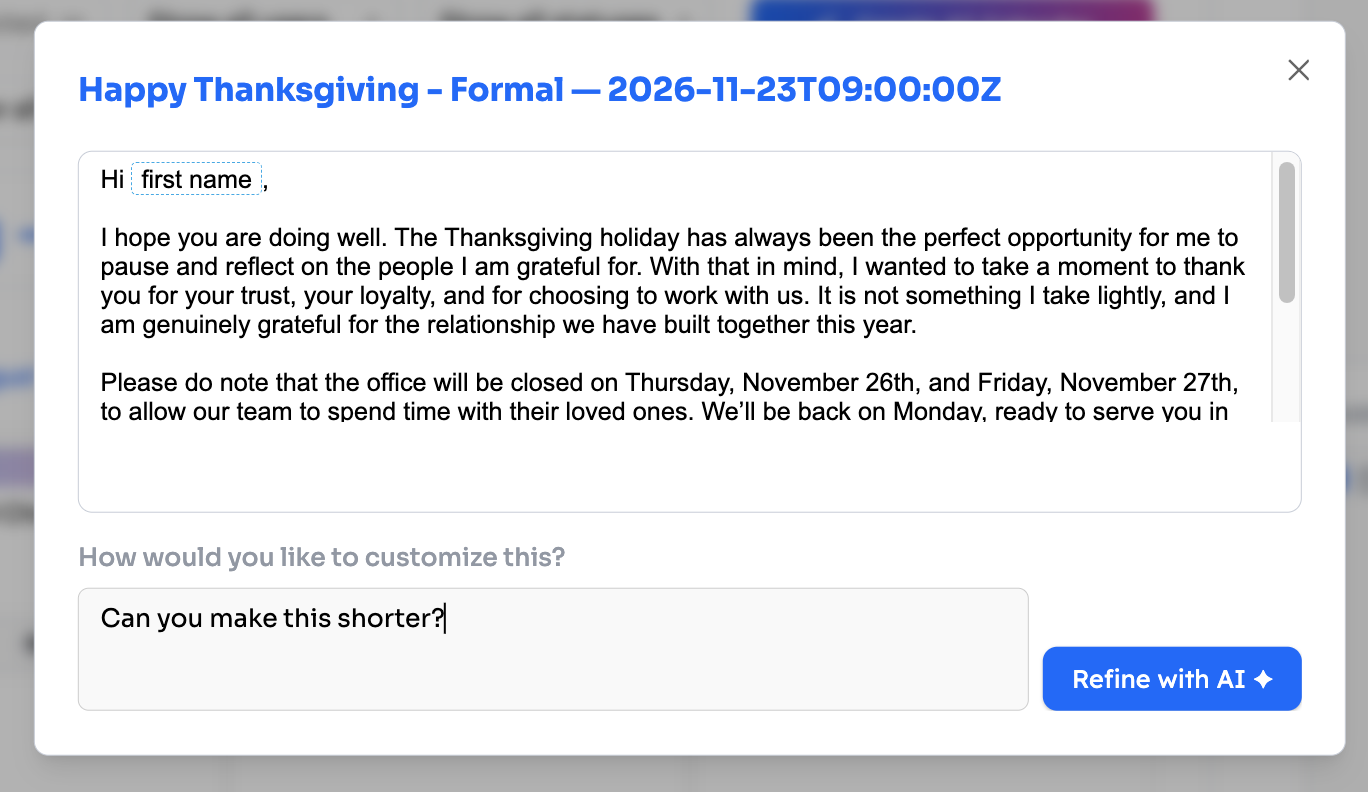
In the Content Calendar, find the suggestion you want to adjust and click its preview icon (the eye). This opens a panel showing the suggested content along with a How would you like to customize this? field.

Typing your instructions
In the How would you like to customize this? field, describe the change you want in plain language — for example, "make it shorter," "add a holiday greeting," or "use a more formal tone." Then click Refine with AI to apply your instructions.
Previewing the updated content
As soon as you submit your instructions, the content preview above the instruction field updates in place with the revised version. If the result isn't quite right, type a follow-up instruction and click Refine with AI again.
Saving your changes
There's no separate save step — whatever version is currently shown in the preview is what's kept. Close the panel with the X once you're happy with the result.
If the suggestion originates from a system or industry template, Levitate automatically creates a private copy of that template on your account before saving your edits — so the shared original is never modified and other accounts are unaffected.