Inserting Links, Images, and More to a Campaign
You can go to create a new campaign, add your subject, any text, and then choose Insert.

When creating an email, the text can be formatted in a few ways. The text can be bold, italic, or underlined, the color can be changed, and so can the font and text size. The fonts that Levitate offers are Sans Serif, Serif, Aptos, Arial, Arial Black, Book Antiqua, Calibri, Century Gothic, Comic Sans MS, Courier New, Georgia, Helvetica, Tahoma, Times New Roman, Trebuchet MS, and Verdana.
Tables, bulleted lists, and numbered lists can be inserted as well. Emojis can also be added through the text formatting menu.
Merge Fields, including Custom Fields, can be inserted.
Media, including a hyperlink, an image, a GIF from GIPHY, a YouTube thumbnail and a file attachment can be inserted using the 'Insert' dropdown.
Inserting an image
First, you'll need to save the image you want to insert to your computer.
Then, in your campaign, select 'Insert' from the toolbar and click on 'Image.' You can click to open the file from your computer, or drag and drop it from your file explorer.

You can also adjust the size of any image after inserting it by clicking on it to select it. Dragging the corner handles resizes the image while maintaining the aspect ratio.
Inserting a hyperlink
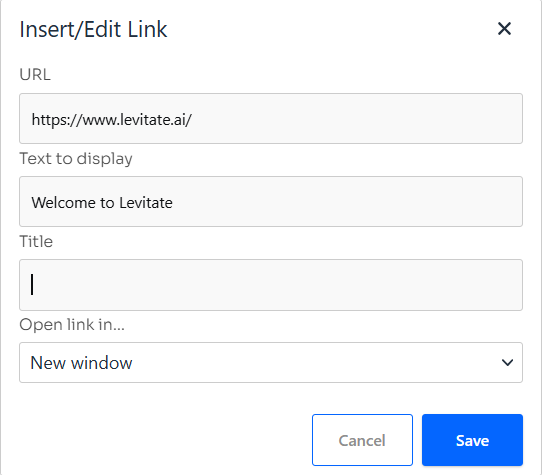
To add a hyperlink, highlight the text you would like to link, then click 'Insert' > 'Link.' A dialog will appear where you can paste the URL you want to link to.
Inserting a GIF
To add a GIF to a campaign, click 'Insert' and then click 'GIF.' You will be taken to GIPHY where you can search for and select a GIF.
Inserting a YouTube thumbnail
To insert a YouTube thumbnail, paste the YouTube link in the 'Insert' > 'YouTube' dialog. Levitate will generate a thumbnail image that, when clicked in the email, links to the video.
Inserting a file attachment
Files can be inserted as clickable links in an email. Go to 'Insert' > 'File' to upload the file. Supported file types include PDF, Word documents, Excel spreadsheets, and more.
Troubleshooting
Images appear compressed horizontally or distorted on mobile devices
Levitate inserts images at a maximum width of 600 pixels with responsive styles (max-width: 100%; height: auto;) so they scale proportionally on smaller screens. If an image looks stretched, squashed, or distorted on mobile, a fixed pixel height is usually the cause.
To fix it:
- Click the image in the editor to select it.
- Remove any explicit pixel height in the image properties, leaving height set to auto.
- Keep the width at or below 600 pixels to fit the standard email column.
- Send a test to yourself and open it on a mobile device before scheduling.
JPEG or PNG format and a file size under 1 MB also help images load reliably on mobile connections.
File attachment is rejected or over the size limit
Levitate enforces an attachment size limit based on your connected email provider. For most accounts it's up to 6 MB total across all attachments in a single email. Some providers (e.g. certain Exchange or Office 365 configurations) impose a lower limit, which Levitate enforces automatically.
If a file is near the limit and the campaign fails to send:
- Compress the file (lower image resolution, or use a PDF compressor) to bring it below the limit.
- Host the file externally (Google Drive, Dropbox, your website) and link to it from the email body instead of attaching directly.
- Split large content across multiple campaigns.
Note: If a file worked previously but is now being rejected, check whether your email provider settings have changed or whether other attachments in the same email are pushing total size over the limit.
Photo appears stretched or distorted in an email letter campaign
Letter-style email campaigns don't constrain image dimensions the way a designed newsletter does. Images wider than the email body in a recipient's client will appear stretched.
To prevent it:
- Resize the image to 600 pixels wide or less before inserting it — most email clients render content at around 600 pixels wide.
- Use JPEG or PNG.
- After inserting, click the image in the editor and set a specific width (e.g. 400 px) rather than leaving it at its original size.
- Send a test to yourself to verify rendering before scheduling.
Note: Older versions of Microsoft Outlook may scale or reposition images differently from Gmail, Apple Mail, or mobile clients. If Outlook recipients report a stretched image, see the Email Rendering Issues in Outlook article.
Error loading Pixabay free photos
If you see "error loading the images" when searching the Pixabay library, the usual causes are:
- A browser extension (ad blocker or privacy tool) blocking the request to Pixabay.
- A temporary connectivity issue between your browser and the Pixabay API.
- Pixabay itself being temporarily unavailable.
Try these steps in order:
- Disable ad-blocking or privacy extensions, then refresh and search again.
- Try a different browser.
- Refresh and retry after a few minutes.
- If the error persists, upload an image from your computer instead.
Note: The Pixabay search connects directly from your browser to Pixabay. Extensions that filter network requests can interfere with this connection even when the rest of Levitate works normally.
Logo has excessive white space or background in email overlay settings
When a logo shows a white box or extra padding in email overlays or header areas, the logo image file has a white or opaque background baked in. Email clients display the image as-is, including any background color.
To reduce or eliminate the white space:
- Use a PNG with a transparent background — the logo will sit directly against whatever color is behind it in the email.
- Crop the image tightly before uploading to remove any padding or margin around the logo.
- Re-upload through your account's logo or branding settings, then update any campaigns or templates referencing the old logo.
Note: The rounded-corner styling on logo overlays is controlled by Levitate and isn't adjustable per campaign. If the corner radius doesn't fit your logo shape, a tightly cropped transparent PNG usually gives the cleanest result.
FAQs
Q: How do I make sure images in my email campaign look correct on mobile devices?
A: Levitate automatically inserts images at a maximum of 600 pixels wide with responsive styles (max-width: 100%; height: auto;) that allow the image to scale down proportionally on smaller screens. To keep images mobile-friendly: do not set an explicit pixel height on the image after insertion (a fixed height prevents proportional scaling); keep the image width at or below 600 pixels; and use JPEG or PNG format. Once your campaign is ready, send a test email to yourself and view it on a mobile device to confirm images render as expected before scheduling.
Q: Can I remove or reposition an image that appears at the bottom of an email template?
A: Yes. If your email template includes an image at the bottom (for example, a product or branding image added when the template was created), you can remove or move it in the editor. Click the image to select it, then press Delete or Backspace to remove it. To reposition it, delete the image from its current location, place your cursor where you want it to appear, and re-add it using the Insert > Image option to upload it from your computer. The Levitate email editor doesn't support copy/paste of images — Insert > Image is the supported way to add an image to an email body.
Q: What is the maximum file size for email attachments in Levitate?
A: The platform default is up to 6 MB total per email. However, your connected email provider may enforce a lower limit. If you hit the limit, Levitate will display a message showing the effective maximum for your account. Compressing the file or sharing it via a link are the most reliable workarounds.
Q: Why does my image look fine in the editor but stretched in the sent email?
A: The editor preview may not perfectly represent how every email client renders images. To ensure a consistent result, resize the image to no wider than 600 pixels before inserting it, set an explicit width in the editor after inserting, and send a test email before scheduling your campaign.
Q: Can I remove the rounded corners from the logo in email overlay settings?
A: The border-radius styling on logo overlays is applied by Levitate and is not adjustable on a per-campaign basis. Using a tightly cropped PNG with a transparent background gives the cleanest appearance within the existing rounded-corner style.
Q: Why do I get an error when trying to search for or add a free Pixabay photo?
A: The Pixabay photo search runs directly from your browser, so browser extensions (especially ad blockers) can block the connection to Pixabay and cause an error. Try disabling extensions, refreshing the page, and searching again. You can also try a different browser. If the problem persists, upload an image from your computer instead using the standard image upload option.
Q: An image appears in the footer of my sent email but I cannot see it anywhere in the editor — how do I find and remove it?
A: If an image shows up in sent emails but is not visible in the campaign editor, it is most likely coming from your email signature rather than the campaign body. Check your signature settings (in your account or connected email provider settings) to see if an image is included there — removing or editing the signature will stop the image from appearing. If the image is in the campaign body but still not visible in the editor, it may be extremely small or have a white fill that blends into a white background; try clicking in the footer area of the editor and pressing Select All or using arrow keys to locate and select it, then press Delete or Backspace to remove it.
Q: A hyperlink works when I test the email but some recipients say the link is not working — why?
A: There are a few common reasons a link works in your own test but fails for certain recipients. First, check that the URL you pasted includes the full protocol — for example, https://www.example.com rather than just www.example.com. Without a protocol prefix, some email clients will not treat the text as a clickable link. Second, corporate security software (such as email security gateways or link-scanning services) used by a recipient's organization can rewrite or strip links before delivery; in that case the recipient should contact their IT team. Third, if your account has click tracking enabled, Levitate wraps each link in a tracking redirect URL — a small number of security tools flag these redirect URLs and block them. If click tracking is suspected, you can ask your Levitate administrator to review the click-tracking setting for your account.