
Automation Reporting
Need to check on, update, or cancel automation sends?
Note: Reporting is available on Business plans. The Upcoming Automations tab appears when automations are turned on for your account, and the Automations Report appears for users whose user group has the View Reporting permission under Automation.
Upcoming Automation Steps
From your Levitate dashboard, choose Reporting from the left-hand navigation menu.

Choose Email Report.

Open the Upcoming Automations tab to see automation steps that are queued to send. Admins can show All Employees or select one employee from the Filter By menu; other users see the steps they send.

You can click the subject of the email to see the content itself. You'll also see the contact profile of the contact you are sending to.

If you click Manage, you'll see all the automation steps and can manage them from the Actions column.

Here's a closeup of the Manage Automation pop-up with a step's actions menu open. The menu offers Cancel Step, plus Edit for queued Email and Newsletter steps.

You can change a step's scheduled date by clicking it, or cancel a single step with Cancel Step.

While the automation is queued or in progress, you can also click Cancel Automation, then click Cancel Automation again to confirm.

Automations Report
To review reporting automation by automation, go to Reporting and choose Automations Report.

Automations are split into Active and Inactive tabs. Each card shows the automation's creator, trigger, steps, and how many contacts are in progress or completed.

When you click See Report, you'll see more details of the sends being made through that automation.

Use Showing to pick a month and Filter by to pick an employee, and click See Details to see every step being sent to a contact. Each row shows the step's message status, such as "Sent on" or "Texted on" with a checkmark, and a Progress label: Not started, In progress, Completed, Cancelled, Failed, or Skipped.
Note: Birthday, Turning 65, Renewal, New Client, New Lead, and New Donor automations open a report that lists each contact with a green checkmark beside the status their current step has reached: Sent, Viewed, Clicked, Replied, or Texted.
Report Columns
The Message and Progress columns appear in the report you open with See Report for an automation, and in the reports for Birthday, Turning 65, Renewals, New Clients, New Donors, and New Leads automations.

The per-automation report has these columns: Recipient, Message, Progress, and an actions column. On the six built-in reports, the last column is named Engagement / Actions.
Message Column
The Message column shows the outcome of the contact's message, along with its date. When a message failed or was skipped, the reason is shown with it.
| Message value | What it means |
|---|---|
| Sent on (date) at (time) | The message was sent on that date and time. |
| Texted on (date) | The text message was sent on that date. |
| Not sent on (date) | The message was not sent on that date. |
| Failed on (date) | The message failed to send on that date. The reason is shown. |
| Skipped on (date) | The message was skipped on that date. The reason is shown. |
| Scheduled for (date) | The message is scheduled to go out on that date. |
| Sending | The message is in the process of being sent. |
| Not sent yet / Not sent | No message has gone out for this contact. |
The name of the automation step appears with the message only when the contact's run includes two or more messages.
Progress Column
The Progress column shows where the contact stands in the automation as a whole, not just the status of one message.
| Progress value | What it means |
|---|---|
| Not started | The contact has not started the automation. |
| In progress | The contact is partway through the automation. |
| Completed | The contact has finished the automation. |
| Cancelled | The automation was cancelled for this contact. The reason is shown. |
| Failed | The automation failed for this contact. |
| Skipped | The automation was skipped for this contact. |
Manage, Cancel, and See Details
On the six built-in reports, the row offers Manage and Cancel until the first message goes out for a contact, and See Details after that. The per-automation report shows See Details on every row.
Manage opens the Manage Automation window for that contact. It lists each step with its sender, status, and date, shows Sent, Viewed, Clicked, and Replied for email steps, and has a Cancel Automation button.

Filtering the Automations Report
On both the Active and Inactive tabs, you can search by automation name and filter by trigger or creator. The Inactive tab also has a status filter for Draft, Disabled, and Archived automations, so look there for an automation that's paused or archived.

Automation Report Metrics
When you click See Report for an automation, the report header displays circular-progress rings summarizing performance across that automation's email steps. The rings shown are Average open rate, Average click rate, and Average reply rate, in that order from left to right.
The Average click rate ring shows the percentage of recipients who clicked a link in that automation's emails. It appears once at least one recipient has clicked a link; until then, it's hidden.
Note: Click tracking is on by default for most accounts. It's always on for steps that use a tag-on-click action or an "if they click" branch.
Updating the Schedule / Changing Dates
To update the date of a particular step for a particular contact:
- Click the Contacts tab on the left-hand Navigation Bar
- Click the Contact's name to open their Contact Profile
- Identify the blue Automations in Progress section
- Click the blue date beside the step
- Select a new date
- Click Update date & time (or Update date for steps that aren't emails)
Cancelling an Automation
To cancel an automation for a particular contact:
- Click the Contacts tab on the left-hand Navigation Bar
- Click the Contact's name to open their Contact Profile
- Identify the blue Automations in Progress section
- Click the blue Manage link on the right side of the appropriate Automation
- Click the blue Cancel Automation button, then click Cancel Automation again to confirm
Removing a Contact from an Automation
- Click the Contacts tab on the left-hand Navigation Bar
- Click the Contact's name to open their Contact Profile
- Identify the blue Automations in Progress section
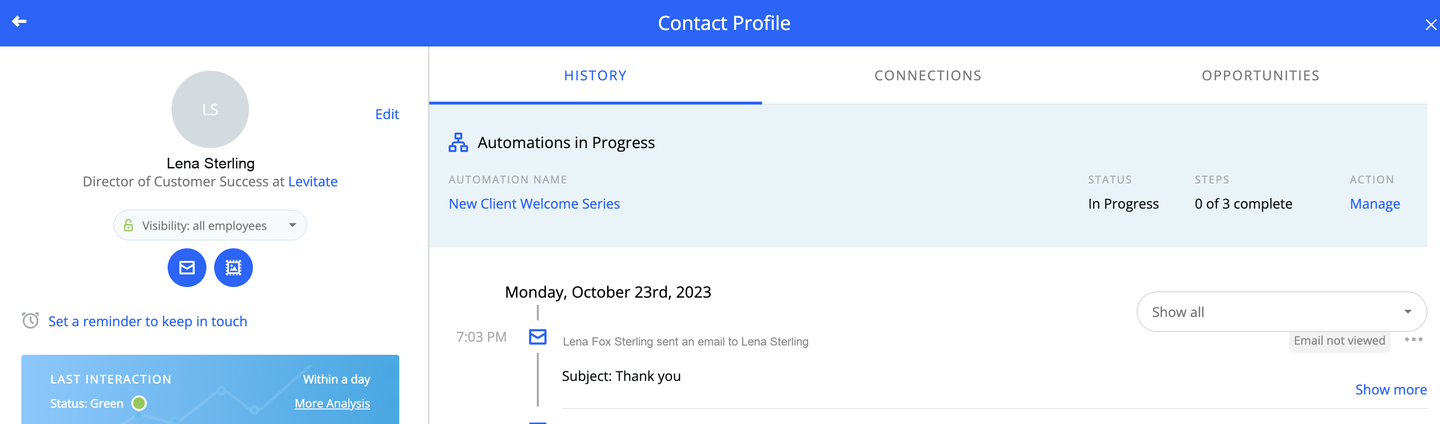
- Click the blue Manage link on the right side of the appropriate Automation
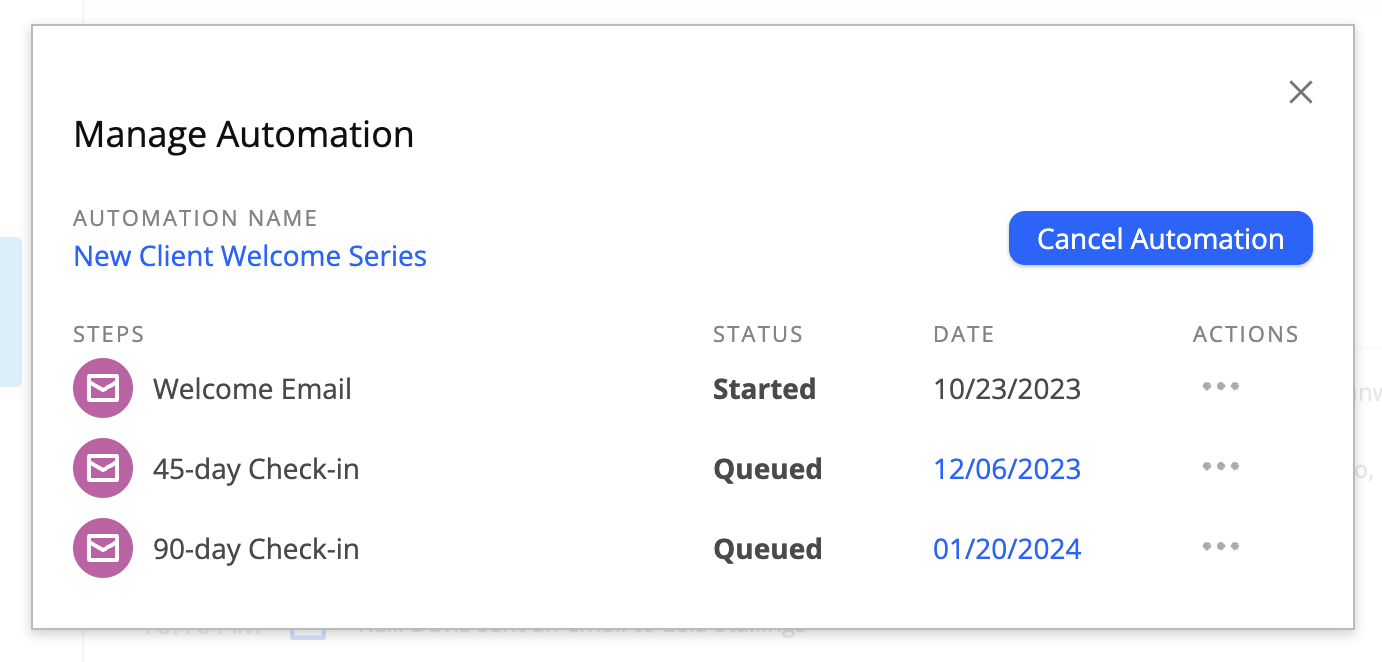
- Click the blue Cancel Automation button, then click Cancel Automation again to confirm
Contact-specific Modifications of an Automation
Updating an Email Message
To update an email message for a particular step for a particular contact:
- Click the Contacts tab on the left-hand Navigation Bar
- Click the Contact's name to open their Contact Profile
- Identify the blue Automations in Progress section
- Click the blue Manage link on the right side of the appropriate Automation
- Click the ellipsis under the Actions column
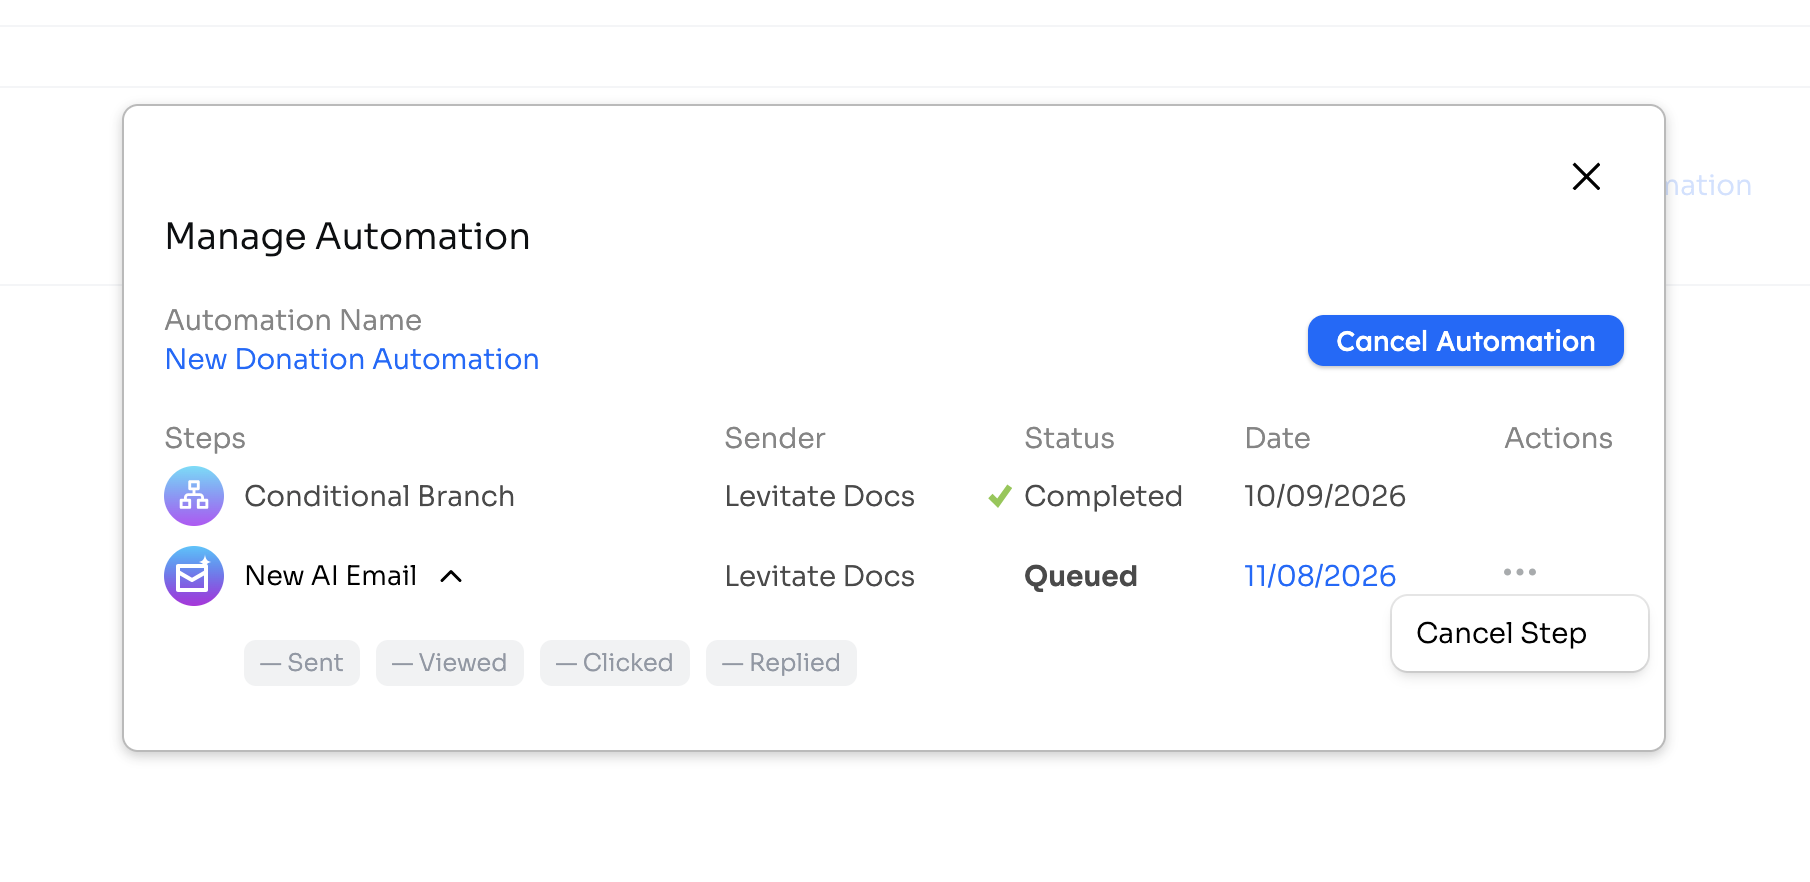
- Choose Edit (available for queued Email and Newsletter steps)
- Modify the message
- Click the blue Done button
FAQs
Q: Where do my queued automation emails appear?
A: Queued automation steps appear on the Upcoming Automations tab of Reporting > Email Report, not under Campaigns or Individual Emails. You can also open a contact's profile and check the Automations in Progress section to review and manage steps that are still queued.
Q: What does the green checkmark in the automation report mean?
A: A green checkmark means the automation step has finished processing. It does not show whether the recipient opened, clicked, or replied to the message. In the Manage Automation pop-up, it appears beside every completed step, including tag and task steps, and email steps read "Sent". In an automation's See Report view, it appears beside "Sent on" or "Texted on". If an email step finished but the email wasn't sent, the row reads "Not sent on" with no checkmark. To check engagement, use the open, click, and reply rates in the report header (see Automation Report Metrics above).